Key Rotation Made Easy with Azure Key Vault and Azure Automation

If you are using secret keys to access resources like Azure Storage, Service Bus etc. it’s a good idea to rotate your keys. It’s a best practice enabling you to replace potentially leaked or compromised keys. How ever this also presents some challenges. Especially if the keys are used in multiple applications, you need to make sure that all the applications are updated with the new keys. If you have your keys in the applications configuration files, (eg. Web.config on an ASP.Net application) then this is a manual effort of updating the relevant values.
This is where Azure Key Vault comes to the rescue. The idea is that the Azure Key Vault will be storing the Keys and then all the applications can refer to that key. Then you only have to update the new key at one place and all the applications that are referring to that key is automatically updated. When we use a service like Azure Automation, we can make this much easier by automating the whole Key Regeneration and update process. Which is awesome. In this article we’ll be looking in to how we can do this.
What we are trying to do is something like this
The ASP.Net application needs to push messages to Azure Service Bus queue. A PowerShell script is ran using Azure Automation Runbook to periodically regenerate the Service Bus primary key of a namespace level shared access policy and updates the Secret on Azure Key Vault. The web applications fetch the Service Bus primary key from the Azure Key Vault to connect to the Service Bus to push the message.
Creating the Web Application
The web application used is a simple ASP.Net Core 2 MVC app created using the default template available on Visual Studio 2017. I have installed the following packages to access the Service Bus Queue and the Key Vault.
- Azure.KeyVault – Allows you to access the Azure Key Vault
- Azure.Services.AppAuthentication (Pre Release) – Allows the app to authenticate using the Azure AD
- Azure.ServiceBus – Allows you to interact with the Service Bus
All the logic related to accessing Key Vault and sending messages is inside the HomeController.cs, I have the following variables define for the Key Vault and Service Bus
private static string KeyVaultBaseUrl = "https://kvkkeyrotationvault.vault.azure.net";
private static string ServiceBusSecretKey = "ServiceBusPrimaryKey";

private static string ServiceBusName = "kvkkeyrotationbus";
private static string ServiceBusAccessPolicyName = "RootManageSharedAccessKey";
private static string ServiceBusQueueName = "myqueue";

private string ServiceBusPrimaryKey;
In the About() action, I am accessing the Key Vault and fetching the Service Bus Primary Key and Sending a message to the Service Bus queue called myqueue .
public async Task<IActionResult> About()
{
  var tokenProvider = new AzureServiceTokenProvider();
  var vaultClient = new KeyVaultClient(new KeyVaultClient.AuthenticationCallback(tokenProvider.KeyVaultTokenCallback));

  var secret = await vaultClient.GetSecretAsync($"{KeyVaultBaseUrl}/secrets/{ServiceBusSecretKey}").ConfigureAwait(false);
  ServiceBusPrimaryKey = secret.Value;

  var person = new Person { FirstName = "Kasun", LastName = "Kodagoda", Age = 30 };

  ViewBag.Message = await SendMessage(person);

  return View();
}
The SendMessage() method sends the queue message to the Service Bus queue.
private async Task<string> SendMessage(Person person)
{
  try
  {
    var connectionString = $"Endpoint=sb://{ServiceBusName}.servicebus.windows.net/;SharedAccessKeyName={ServiceBusAccessPolicyName};SharedAccessKey={ServiceBusPrimaryKey}";
    var client = new QueueClient(connectionString, ServiceBusQueueName);

    var message = new Message(Encoding.UTF8.GetBytes(JsonConvert.SerializeObject(person)));
    await client.SendAsync(message);
    await client.CloseAsync();

    return "Message Send";
  }
  catch (Exception ex)
  {
    return ex.Message;
  }
}
Then I have published the application to Azure App Service. After that you have to enable Managed Service Identity for the App Service so that the Application can access the Key Vault. You can find more about this from this previous article Using Managed Service Identity to Access Azure Key Vault from Azure App Service.
Create Azure Automation Account
Search for Automation Accounts in the All Services and on the Automation Accounts blade click on Add button or Create Automation Account button to create a new Automation Account.
Provide the Name for the automation account and a Resource Group to put it in. Select the Location and leave the default value of Yes for Create Azure Run As Account. Click on the Create button to create the automation account.
Give Access to Azure Automation Account to the Azure Key Vault
Next you need to give access to the newly created automation account to access the Azure Key Vault instance. When the automation account is created it creates 2 Run As Accounts. An Azure Run as Account and a Classic Run As Account. The Azure Run as Account create an Azure Active Directory Application and a Service Principle for us. We can use this Azure AD Application to give access to Azure Key Vault.
Click on the Run as Accounts link on the Automation Accounts, Account Settings section and click on the Azure Run As Account. And then in the Azure Run As Account blade, You can see the details related to the Azure AD Application and the Service Principle. Copy the Display Name of the Azure AD application so we can search for it.
Next, navigate to the Azure Key Vault instance and go to the Access Policies section. Click on the Add Button and In the Add Access Policy blade click on the Select Principle button and paste in the Name of the Azure AD application name for the Automation Account. Select the application from the list. And Click on Select button. I have given Secret Permission to Get, List and Set secrets. Click on Ok and Save buttons to save the access policy.
Now the Automation Account can access the Key Vault instance.
Add Required PowerShell Modules to Azure Automation Account
The PowerShell runbook we create uses AzureRm.KeyVault and AzureRm.ServiceBus modules. But by default, these modules are not installed in the Automation account. And these 2 modules also depend on AzureRm.Profile module version 4.6. So you need to Install/Update the AzureRm.Profile module as well. We’ll just add that module and it will automatically update it and all its dependencies.
We need to Install
- Profile
- KeyVault
- ServiceBus
PowerShell Modules.
Click on the Browser Gallery button to search for the PowerShell Modules. Search for the required modules and Select the module from filtered results.
Click on the Import button and on the Import blade, click on Ok to import the module. This will take few minutes to complete. Do the same for the other 2 modules as well. After the required modules are installed, we can create the PowerShell script that is run by Azure Automation Runbook.
Create the Azure Automation Runbook
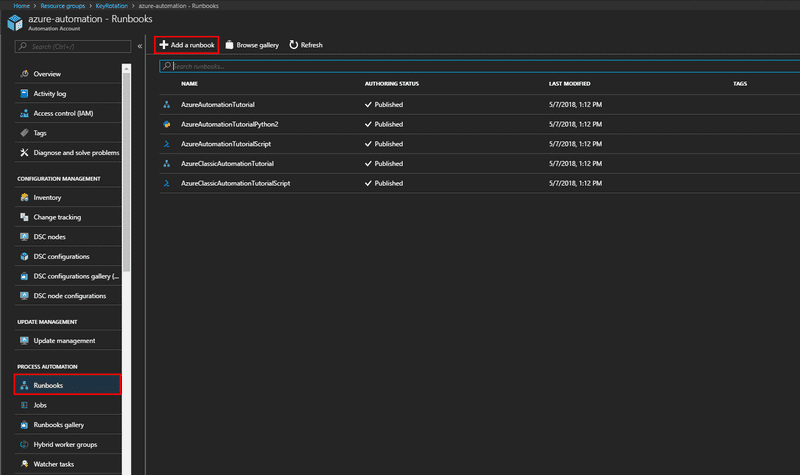
Navigate to the Automation Accounts Process Automation section and Click on the Runbooks link.
Here you can already see some of the Runbooks that is already created. These are some tutorial runbooks that you can check out. We will create a new runbook by clicking on thee Add a Runbook button to add a new Runbook.
On the Add Runbook blade you can give the runbook a Name and Select the Runbook Type. Select PowerShell as the type since we will be using a PowerShell script. Click on Create to create the runbook. Then you will be taken to the Edit PowerShell Runbook blade. Here you can add the PowerShell script to do your work.
After adding the PowerShell script, click on the Save button to save the changes. After saving, you need to publish the changes so the Changes are available. To do this, Click on Publish button. Without publishing, any new change will not be available to run.
The PowerShell script we use is given below
# ------- Required for Azure Automation Runbook --------- #

$azureAutomationConnectionName = "AzureRunAsConnection"

# Get the connection "AzureRunAsConnection
$servicePrincipalConnection = Get-AutomationConnection -Name $azureAutomationConnectionName

# Adds the Authentication Account
Add-AzureRmAccount -ServicePrincipal -TenantId $servicePrincipalConnection.TenantId -ApplicationId $servicePrincipalConnection.ApplicationId -CertificateThumbprint $servicePrincipalConnection.CertificateThumbprint

# ------- Required for Azure Automation Runbook --------- #


# Set the Variales
$resourceGroupName = 'KeyRotation'
$serviceBusName = 'kvkkeyrotationbus'
$serviceBusAccessPolicyName = 'RootManageSharedAccessKey'
$keyVaultName = 'kvkkeyrotationvault'
$keyVaultSecretKey = 'ServiceBusPrimaryKey'

# Regenerate the Service Bus Primary Key
New-AzureRmServiceBusKey -ResourceGroupName $resourceGroupName -Namespace $serviceBusName -Name $serviceBusAccessPolicyName -RegenerateKey PrimaryKey

# Get the newly regenerated Primary Key
$primaryKey = (Get-AzureRmServiceBusKey -ResourceGroupName $resourceGroupName -Namespace $serviceBusName -Name $serviceBusAccessPolicyName).PrimaryKey

# Convert the Primary Key to Secure String
$secureValue = ConvertTo-SecureString $primaryKey -AsPlainText -Force

# Update the Secret Value in the Key Vault
Set-AzureKeyVaultSecret -VaultName $keyVaultName -Name $keyVaultSecretKey -SecretValue $secureValue
The first 3 lines of uncommented code (Lines 3, 6, 9) is for the Automation account to Connect to the Azure subscription using the Service Principle it created when the account is created.
The next lines of code are where we do our work. We define some variables to store the values related to the resource, including the Resource Group, Service Bus and the Key Vault. In the line 23 we regenerate the Primary Key of the Service Bus level Shared Access Policy named RootManageSharedAccessKey.
Then in the Line 26 we get a reference to that Primary key. Then in the Line 29 we convert that Primary Key in to a Secure String. Then Finally on the line 32 we Update the Secret value stored in the Azure Key Vault instance.
Schedule the Execution of The Runbook
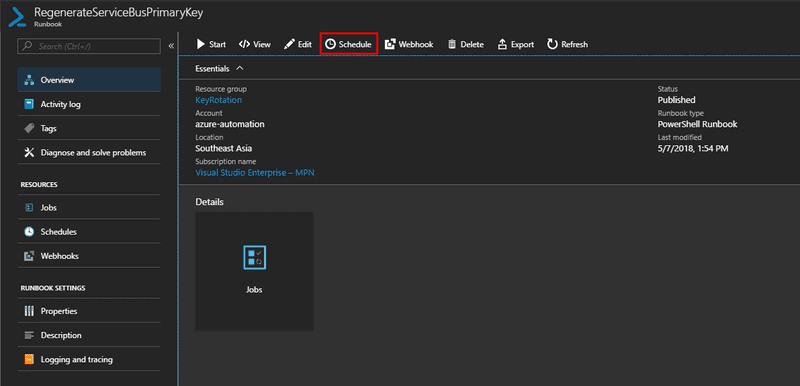
Since now we have the Runbook ready, we need to schedule the runbook to execute periodically. On the Runbook Overview blade, click on the Schedule Button.
Then on the Schedule Runbook blade, click on Link a schedule to your runbook option. The click on Create a new Schedule button and Setup a new Schedule on the New Schedule blade.
Give a Name for the schedule, I am planning to run the Key Regeneration every month so I gave, RunEveryMonth as the name. Then you need to set the Start Date and Time for the runbook. Select Recurring for the Recurrence options and set to recur ever Month. You can set the Monthly Occurrences and Set it to Run on the last day of Month and Set Expiration value. Once the Schedule is configured, click on Create to create the schedule. Finally click on Ok button to complete the schedule.
Unless you want to wait a month to see the changes, you can run your Runbook immediately as well. To do that click on Start button on the Runbook Overview blade
This will queue the runbook to run and take you to the Job blade to show the progress
Here you can see the Job Status, Input, Outputs and Logs for the Job. You can inspect the logs to see the details about the output and if there are any issues. Clicking on the log entries you can see the details.
Here you can see that the Primary Key of the Service Bus is regenerated and in the next log entry you can see that the Runbook sets the Azure Key Vault secret.
And that is it, once you run the application locally or on the App Service instance, you can see that the Service Bus secret is successfully retrieved and the message is sent to the Service Bus queue.
You can Find the Sample Code for the Application on GitHub
Related References
You Might Also Like
← Previous Post
Next Post →


