Create Work Items In Visual Studio Team Services/Azure DevOps Directly From Application Insights Inside Azure Portal

Azure Application Insights is a great offering provided by Azure for Application Performance Monitoring. It’s very easy to integrate it with your applications and now App Insights provide a fantastic capability to create work items for the issues shown in Application Insights in Visual Studio Team Service or GitHub. In this article we will discuss about creating work items in Visual Studio Team Services.
I have created an ASP.Net Core MVC web application using the template provided by Visual Studio and hosted it on an App Service web app. Then to simulate an error in the application, I added code to throw a SecurityException when you navigate to Contact view. These exceptions will be shown in the Application Insights. Pretty simple setup.
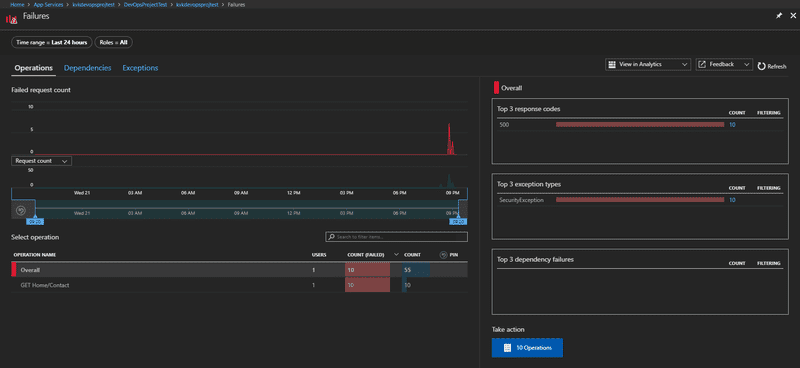
You can see the logged exceptions, when you click on the exceptions section, you will be taken to the Failures blade. There you can see all the exceptions and some related information.
If you select one of the exception types, you will see more details and you can scroll through and select an exception to see the detailed information.
Then you are taken to the blade where you are shown the End-To-End Transactions for the selected exception.
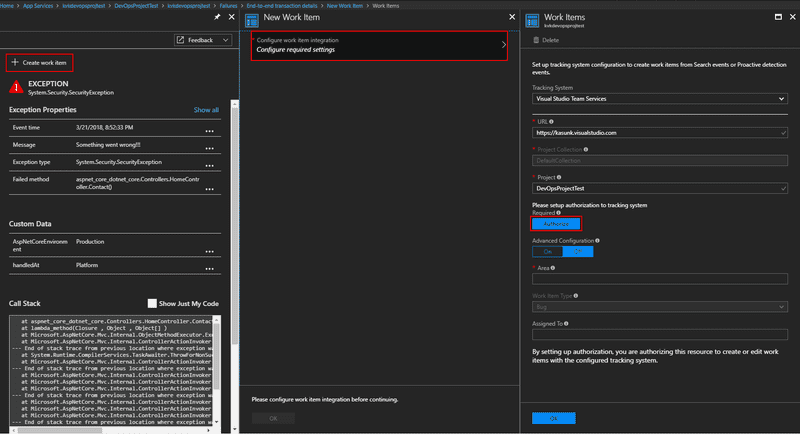
Here you can see the exceptions details including the message, event time, exception type, custom data and the call stack for the exception. And on this blade, you can also see a button called Create Work Item.
When you click on the button, you are taken to the New Work Item blade. If you have not already configured the work item tracking system, you are shown a link to Configure work item integration. In the configuration blade you can select the Tracking System. You have the options to select Visual Studio Team Service and GitHub. We will be using Visual Studio Team Services for this post. Next you need to select the URL for the Work Item tracking system. And then add the Project Name. Then you need to authorize Azure to access your Visual Studio Team Services instance. Click on the Authorize button to proceed.
Then you will be presented a browser window to allow access to Visual Studio Team Services for Azure. Click on Accept to proceed. Then you need to add the Area where your work item will go in to. The default Area will be under the project name. So, I have added that. To see how you can create new Areas, follow this documentation link.
Also, here you can add a user in Visual Studio Team Services to assign this work item to. Add the user you want to assign this item to Assigned To text box. The once you are done, click on OK button to continue. Then you are taken back to the New Work Item blade.
Here also you have to option to change the Title of the Work item, change the Area and Assigned To option. The Details will automatically be populated with details collected from the exception. You can add your own here as well. Then click on Ok to create the work item.
Now if you go to your Visual Studio Team Services instance and navigate to the Work Items section in your project, you can see the new Work Item, which is a Bug that was added from within Application Insights.
If you open up the Bug, then you can see the basic information is already added including the Description. The description contains the information taken from the exception. And you will also have the links to go to the Azure portal to see the exceptions details and the related information.
So, you can see that its really easy now to add work items to your Visual Studio Team Services instance directly from Application Insights whenever you see an issue in application insights, without having to navigate to Visual Studio Team Services and manually add all the information, which is absolutely great.
You Might Also Like
← Previous Post
Next Post →


