Deploying Highly Available Azure Virtual Machines

When you deploy applications on Virtual Machines, you need to think about the availability of your application in case any unexpected outage happens. A highly available cloud application must implement strategies to counteract and absorb these outages which can come as a result of many reasons including failures of underlying Azure Platform infrastructure, planned/unplanned maintenance of the said infrastructure etc.
When considering about availability of an application, we need to think about underlying infrastructure and its dependent services. Highly available applications need to remove single points of failure through redundancy and resilient design. In this article, we will discuss how to make sure your applications deployed on Azure Virtual Machines are highly available by making the Virtual Machines we crate resilient to unexpected outages of underling Azure Platform. Before We start to create the infrastructure, we need to understand few concepts at work here. We need to know what an Availability Sets, Fault Domains & Update Domains mean in order to understand how to create Highly Available Azure VMs.
Availability Sets
Availability Set is a logical grouping that Virtual Machines gets placed in to. Azure Platform distributes the Virtual Machines across the underlying Azure Infrastructure, when you place Virtual Machines in side an Availability Set. The value of Availability Set is that, when a fault happens in underlying infrastructure or when a planned maintenance happens on the Azure Platform Availability Sets makes sure that at least one Virtual Machine is up and running. The Azure SLA (Service Level Agreement) guarantees 99.95% up-time for your Virtual Machines in the standard storage tire provided that you have at least 2 Virtual Machines deployed inside an Availability Set.
Note: When you use Azure Premium Storage Tier, you don’t have to have 2 Virtual Machines to have 99.95% uptime. You have Single Instance SLA for Premium Tier
It’s a best practice to have Availability Sets and not have applications on a single Virtual Machine. A single Virtual Machine does not provide protection from planned or unplanned interruptions even if it’s located inside an Availability Set
Fault Domains
A Fault Domain is a set of Virtual Machines that share the same power source and network switch inside an Azure Data Center. This basically translates to a Rack of Servers that contains the Virtual Machines. When you deploy a Virtual Machine in Azure you have up to 3 Fault Domain available to you. So, your Virtual Machine can be spread across up to 3 server racks.
Update Domains
An Update Domains are the Virtual Machines that share the same hardware host. When you create a Virtual Machine on Azure you have 5 to 20 Update Domain available to you. There can be several Update Domains on the same server rack. Remembers it’s a set of VMs that share the same hardware host. One Hardware Host can have multiple Virtual Machines sharing the resources. Virtual Machines that belongs to the same Update Domain can be maintained, rebooted or fail (If a failure occurs on the Hardware Root) at the same time. If you have multiple Virtual Machines, those will be spread across the Update Domains.
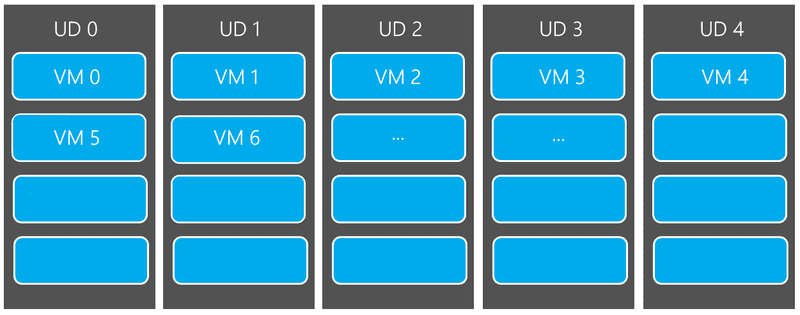
Let’s take an example: You have created 7 Virtual Machines and you have 5 Update Domain that was assigned by default. So, your first 5 virtual machined will be placed in to 5 different Update Domains (1 through 5) and the 6th virtual machine will be placed in to the 1st Update Domain where the 1st Virtual Machine was placed in to and the 7th Virtual machine will be placed in to the 2nd Update Domain where 2nd Virtual Machine was placed in to. Look at the diagram bellow.
Let’s start to crate the highly available virtual machine infrastructure using the Azure Portal. We will start by a Virtual Network & a Subnet, a Network Security Group, Storage Account and An Availability Set before creating the Azure Virtual Machine.
It’s a best practice to create the Virtual Network, Network Security Group, Storage Account, Availability Sets before you create your Virtual Machines even if when creating new Virtual Machines, you can create them or use the resource provided by default. You should always plan ahead and create these resources beforehand because changing some of these after creating the Virtual Machine is not possible (or very difficult.) without recreating the Virtual Machines
Creating the Virtual Network & Subnet
Before you start creating your Virtual Machine, it’s a best practice to create the Virtual Networks. You need to plan and get this right because it’s difficult to change this after creating the VM. You have to recreate the VM in order to change the Virtual Network the VM belongs to by deleting the VM and saving the storage and recreate the VM and use the saved storage and point the new VM to the correct Virtual Network.
From your Azure Portal Click on Virtual Network Link on the left navigation bar. (or search for Virtual Network on the search box)
Then click Add button on the top bar to move to the Create Virtual Network Blade.
Here you need to put in a Name for the Virtual Network along with an Address Space, A name for the Default Subnet and an address range for the Subnet. Then select the Subscription you want to use and Create a new Resource Group to hold the resources or Use an existing one. Then the location of the resources. Finally click create button to create the Virtual Network. This will only take few seconds.
Now in the Virtual Network blade, you should see a new Virtual Network created and ready to use for our VM. If you don’t see the new Virtual Network, click on the Refresh button to refresh the blade.
Creating the Network Security Group
Network Security Group is the software firewall that controls access in to and out of the Virtual Network that is associated with the Virtual Machine that you create. You can have multiple Inbound Rules and Outbound Rules associated with a Network Security Group (NSG) that controls access to the Virtual Network.
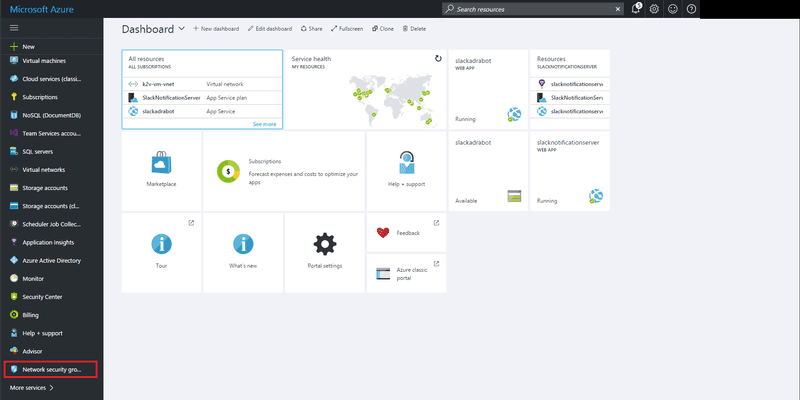
From your Azure Portal Click on Network Security Group Link on the left navigation bar. (or search for Network Security Group on the search box)
Then click Add button on the top bar to move to the Create Network Security Group Blade.
You need to put in a name for the Network Security Group and select the subscription, and a Resource Group and Location. I’m going to select the resource group that we created earlier for the Virtual Network. We are going to put all the resource related to this article in that Resource Group.
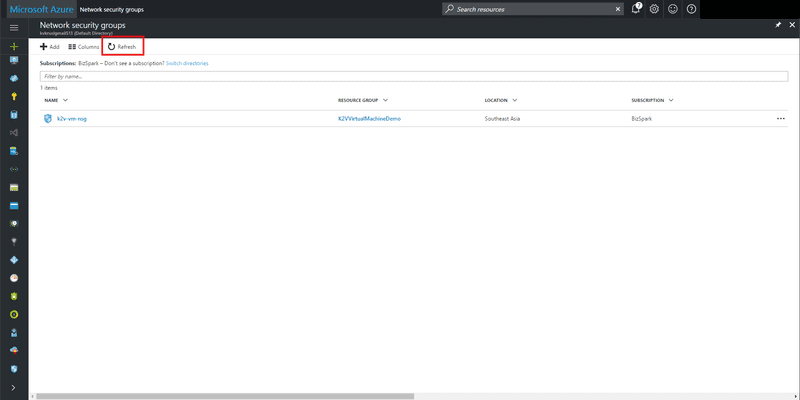
Now in the Network Security Group blade, you should see a new Network Security Group created. If you don’t see the new Network Security Group, click on the Refresh button to refresh the blade.
Click on the newly created Network Security Group and you can see the blade that displays the summary for the NSG. You can create Inbound and Outbound Rules that controls access.
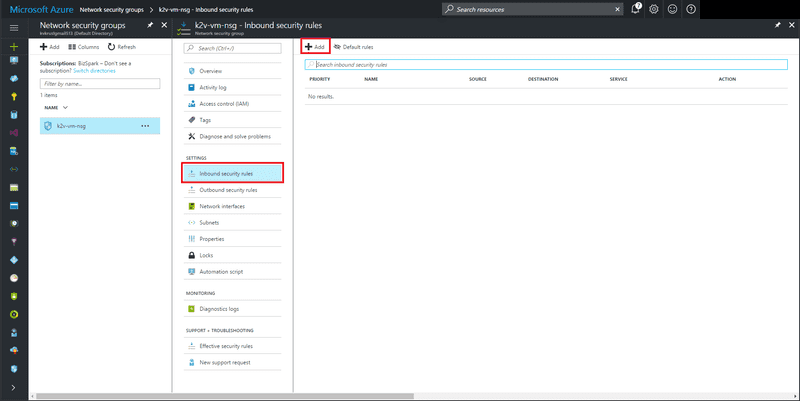
Click on the Inbound Security Rules link in the Settings section to Add a new rule. Click on add button on the top tool bar and you will be taken to a new blade where you can add the Inbound Security Rule
As an example, lets and a HTTPS rule as an inbound rule. Add the name as HTTPS and you can add a priority for the rule. in the Service section select HTTPS from the dropdown menu. This will populate the Protocol and the Port range for HTTPS. If you want to add a custom rule by selecting the Protocol and port range, select Custom from the Dropdown list. Then select the action to Allow or Deny access. I will select Allow for this. Finally click OK to create the rule.
In the Inbound rules section for the NSG, now you can see the newly created Inbound Rule. There are some default rules that Microsoft has created that are already added to both Inbound and Outbound Rules. These include rules to allow Any inbound traffic from Virtual Network, allow the traffic from Azure Load Balancer and to deny traffic from all other inbound which act as a “Blanket Catch”. Click on the Default Rules button on the top bar to see the Default Rules.
Now you can see the default rules are also added to the Inbound Rules Section.
You can also go the Outbound Security Rules section and click on the Default Rules button to see the Microsoft Created default outbound security rules.
Now if you click on the Overview link in the left navigation of NSG, you can see the overview of the Rules that were added. Note that you will only see the inbound and outbound rules that you have added here. The default rules will not be displayed.
Create the Storage Account
We need to create a Storage Account in order to store the data for the Virtual Machine. VHDs will be attached to the Virtual Machine we create and they will be stored in the Storage Account we associate with the Virtual Machine at the time of its creation.
From your Azure Portal Click on Storage Account Link on the left navigation bar. (or search for Storage Account on the search box)
Then click Add button on the top bar to move to the Create Storage Account Blade.
Add a globally unique name for the Storage Account name. Select Resource Manager as the deployment model. Keep the Account kind to General Purpose. Performance tier of the Storage account is important. Standard is the standard HDD storage and Premium is SSD storage. Let’s select Standard for this one. Select the Replication level you need, I’m going to keep the default here. Then you can enable or disable Storage service encryption. Finally, as usual select the Subscription, Resource Group (We’ll select the previously created Resource Group for this one.) and the location of the resource and click Create.
Finally, you can see that the storage account is created.
Create the Availability Set
The important part when it comes to crating Highly Available Virtual Machines is to create the Availability Set. It does not cost you anything to create an Availability Set. Its free of charge.
From your Azure Portal Click on Availability Set Link on the left navigation bar. (or search for Availability Set on the search box)
Then click Add button on the top bar to move to the Create Availability Set Blade. Then click on the Add button on the top bar to move to the Create Availability Set blade. Add a name for the availability set and select the subscription, resource group and the location as usual. Then comes the important settings. If you remember the start of the article we discussed about the Fault Domains and the Update Domains, here you need to select the Fault and Update Domains as you want. For this demo, we will select the default of 2 Fault Domains and 5 Update Domains.
The next part is also very important. For the setting Use Managed Disks, for this demo we need to select No. Since we created a Storage Account to store the VHDs we need to select No in this time. But if you decide to go with Azure Managed Disks for VHDs, then you need to select Yes. There are differences between Storage Account based VHD and Managed Disks, which is out of the scope of this article. We will discuss the differences and the benefits on a separate article. For now, we will go in the more traditional approach of having a Storage Account to store the VHDs and select No for the Use Managed Disks option. Click Create to finish creating the Availability Set.
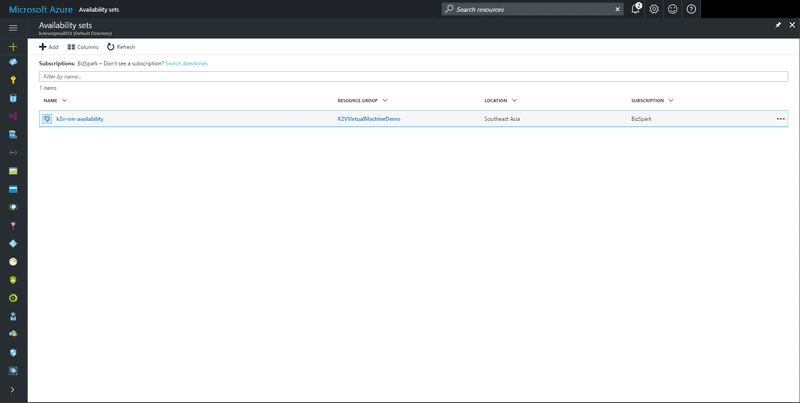
Now in the Availability Set blade, you should see a new Availability Set created and ready to use for our VM. If you don’t see the new Availability Set, click on the Refresh button to refresh the blade.
Now we are done with creating the additional resource required for creating the Virtual Machine. We took the longer route of creating the required Virtual Networks, Network Security Group, Storage Account and Availability Set upfront following the recommended way of doing it, just to show the full picture of what resources are needed to create Highly Available Virtual Machines in Azure and how to properly create them.
Create the Virtual Machine
Let’s create the Virtual Machine using the resources we created earlier. We are going to create a Windows Server 2016 Data center VM for this demo.
From your Azure Portal Click on Virtual Machine Link on the left navigation bar. (or search for Virtual Machine on the search box)
Click on the Add button on the Virtual Machines blade and you will see a new blade to search for Virtual Machine Images available to you. Select Windows Server icon from the Recommended section and a new blade with multiple versions of Windows Server will show up. From this list select Windows Server 2016 Data center version, then a new blade with the summary of Windows Server 2016 Data center image will show with the documentation and legal terms. Select Resource Manager as the Deployment Model and Click create to start creating the Virtual Machine.
Now you will be navigated to the Create Virtual Machine blade and there are few sections here that you need to fill out in order to create the VM. First, in the Basic section you need to add a name for the Virtual Machine and select the VM disk type. Before when we created the Storage Account we selected the Standard Storage where the type will be HDD, so select HDD for the VM disk type. Add a username and password and confirm the password. The password should confirm to the password policy for Azure VMs. Finally, as usual select the Subscription, previously created Resource Group and the Location for the VM.
Next up you need to select the size of the VM. There are lots of VM sizes to choose from and you can see all the Sizes by clicking on the View All link. There will be 3 recommended sizes by Microsoft and we will select the D1_V2 Standard size for our VM. Note that the estimated cost for the VM is displayed at the bottom of each VM sizes. Click Select to complete the size selection
For the Step 3, you need to add some more settings for the VM. For Use Manages Disks select No. We will discuss Managed Disks for VM on another article. But for now, let’s continue with Selecting NO for using managed disks. Click on the Storage Account section and from the Choose Storage Account blade that pops up, you need to select the Storage Account we created prior to this step.
Next, click on the Virtual Network menu item on the Network Sections of the settings, From the Choose Virtual Network blade, select the Virtual Network We created earlier.
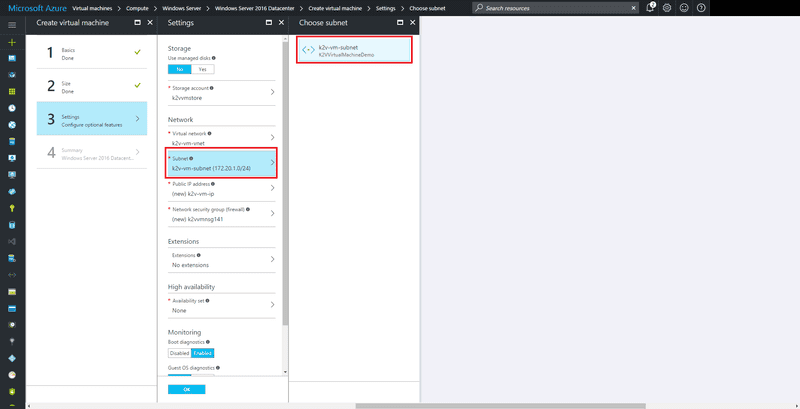
When we created the Virtual Network, we also created a Subnet for it as well. Click on the Subnet menu item and from the Choose Subnet blade select the Subnet we created earlier.
Next we need to create a Public IP address for the Virtual Machine. A Public IP address is needed to access the VM from the public internet. To create one, click on the Public IP Address menu item and from the Choose Public IP address blade click on Create New button to Create a new Public IP address. A blade will pop up where you need to add a name for the IP address and assign either Dynamic or Static IP address. A dynamic IP address will change each time you de-allocate and start the VM back on. But a static IP address will not change. But to assign a Static IP address you need to pay for it. For this demo, we will select Dynamic IP address. Click Ok to create the Public IP address.
Next we need to select the Network Security Group we created prior to creating the VM. The Network Security Group (NSG) acts as the software Firewall for the Virtual Network we created. Click on the Network Security Group menu item and select the NSG we created earlier.
We can ignore installing VM extensions for now. Next we need to select the Availability Set for enabling High Availability. In the High Availability section click on the Availability Set menu item and select the Availability Group we created earlier from the Change Availability Set blade.
Finally, in the Monitoring section, we can enable Boot Diagnostics and Guest OS Diagnostics. It’s a best practice to enable diagnostics in order to troubleshoot issues with the VM. However, when you enable diagnostics, you need to provide a Storage Account to store the diagnostic data. Normally we create a separate Storage Account to store the diagnostic data. But for this example, we will select the existing Storage Account we created. Finally, click ok to finish up configuring the Settings for the VM
Now a Summary blade will come up with validating the configuration for the VM. Here you can Click OK to deploy the VM and/or you can also download the Azure Resource Manager (ARM) templates and parameter files to deploy these resources as well. This is helpful when you need to create multiple Virtual Machines. You can simply change the parameters on the parameter file and deploy a whole new Virtual Machine. We will talk about Azure Resource Manager (ARM) templates in a separate article. Now click OK to create the VM.
It will take a few minutes to create the VM and start it up. After few moments, the new VM should appear in the Virtual Machine Blade.
If you navigate to the Resource Group that we created. You can see all the resources we crated for the Virtual Machine are grouped in to the Resource Group for easy management.
This has been a fairly long article about creating Highly Available Virtual Machines on Azure and the concepts and resource behind it. I wanted to give a step by step overview about creating each of the resources need for the Virtual Machine and the best practices when creating the resources. To make it truly highly available, having only one Virtual Machine is not enough. We need to have at least 2 or more VM for this and use a Traffic Manager to direct traffic for these Virtual Machines, but this is an overview of how to create VMs for this process. Hope you get a good understanding about creating Highly Available Virtual Machines on Azure. Until next time, C ya :)
Tags:
You Might Also Like
← Previous Post
Next Post →


